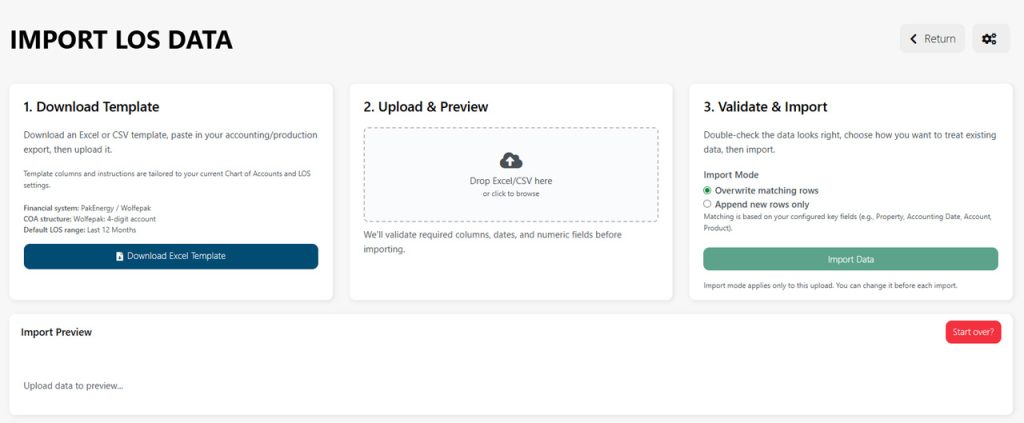
Use the Import LOS Data page to upload accounting and production data into Upstream+. This page walks you through downloading the correct import template, uploading your completed file, previewing the data, validating it, and importing it into your LOS reports.
The import process is designed to help prevent bad data from reaching your reports by checking required columns, date formats, numeric values, and field mappings before the final import.
When to use this page
Use this page when you need to:
- Import new LOS data into Upstream+
- Refresh existing LOS data from your accounting or production system
- Upload activity from a completed Excel or CSV template
- Preview uploaded data before it is added to your reports
- Replace or append data for a reporting period
If your reports are missing recent activity, this is usually the first place to check.
Before you import
Before downloading the template or uploading data, confirm that your LOS Settings are correct. The import template is based on your organization’s configured financial system, Chart of Accounts structure, and default LOS range.
The page displays a summary of these settings before you download the template, including:
- Financial system
- COA structure
- Default LOS range
If these settings are wrong, go to LOS Settings first, update the configuration, and then return to the Import page.
Step 1: Download the template
Start by clicking Download Excel Template.
The template is tailored to your current Upstream+ settings. This helps make sure the columns and instructions match the structure expected by your organization’s LOS setup.
After downloading the template:
- Open it in Excel.
- Paste or enter your accounting and production data.
- Review the required columns.
- Save the completed file.
- Return to Upstream+ to upload it.
Use the latest downloaded template whenever your LOS Settings change.
Step 2: Upload and preview your file
In the Upload & Preview section, drag your completed Excel or CSV file into the upload area, or click the upload box to browse for the file.
Upstream+ accepts Excel and CSV files. After you select a file, the system begins checking the file structure and preparing a preview.
The preview helps you confirm that:
- The correct file was selected
- The rows are being read correctly
- Dates and numbers are formatted properly
- Required columns are present
- The data is ready to import
If the preview does not look right, stop and fix the file before importing.
Step 3: Choose an import mode
Before importing, choose how Upstream+ should treat rows that may already exist.
Append missing rows only
Use Append missing rows only when you want to add new records without replacing existing matching rows.
This is the safer option when you are adding recent activity or importing data that should not overwrite prior records.
Overwrite matching rows
Use Overwrite matching rows when the uploaded file should replace existing records that match the same key fields.
Matching is based on your configured key fields, such as:
- Property
- Accounting Date
- Account
- Product
Use this option when you are intentionally correcting or refreshing previously imported data.
Append Sheets
In some import situations, Upstream+ may ask which sheets should be included or replaced from the uploaded file.
Use the Append Sheets section to choose the sheet data that should be processed during this import.
Only select sheets that you are ready to import.
Financial system mismatch warning
If the uploaded file appears to come from a different financial system than the one configured in LOS Settings, Upstream+ may show a warning.
For example, if your organization is configured for one accounting system but the uploaded file looks like it came from another, review the warning carefully before continuing.
If the warning appears:
- Confirm the file is the correct file.
- Confirm LOS Settings are correct.
- Download a fresh template, if needed.
- Re-upload the corrected file.
Do not continue with the import unless you are confident the file matches your setup.
Import Preview
The Import Preview table shows the data that Upstream+ detected from your uploaded file.
Use the preview to review the file before clicking Import Data.
Check for:
- Missing values
- Incorrect dates
- Incorrect account names
- Unexpected blank columns
- Wrong sheet selection
- Numbers that appear in the wrong column
- Data that appears shifted or misaligned
If something is wrong, fix the source file and upload it again.
Import Data
After the file has been uploaded, mapped, and validated, click Import Data to begin importing the data into Upstream+.
The button may remain disabled until the uploaded file passes the required validation checks.
Do not click Import Data until you have reviewed the preview and confirmed the import mode.
Processing Import modal
After the import begins, Upstream+ opens the Processing Import modal.
This modal shows:
- Current import status
- Processing message
- Progress percentage
- Row count
- Current processing phase
Keep the modal open while the import is running.
When the import is complete, you may see an option to close the modal or go directly to the LOS Statement.
After the import finishes
After a successful import, go to the LOS Statement or related reports to confirm the new data appears as expected.
Recommended checks:
- Open the LOS Statement.
- Confirm the correct property or field is selected.
- Check the reporting month range.
- Review totals for reasonableness.
- Open related Budget vs Actual or Well Summary reports if applicable.
If data does not appear, check the selected filters, date range, and import file contents.
Troubleshooting
The Import Data button is disabled: The file may not have passed validation yet. Review the preview, required columns, and any visible warnings.
The preview is blank: Confirm the file contains data in the expected sheet and that it was saved correctly.
The columns do not match: Use Manual Field Mapping if it appears. Otherwise, download a fresh template and copy your data into the correct columns.
The wrong financial system appears: Go to LOS Settings and confirm the selected financial system and COA structure.
I imported the wrong file: Use the appropriate import mode on a corrected file, or contact support before making additional changes if you are unsure how to reverse the import.
Some rows are missing: Check the date range, required fields, validation errors, and whether the file was imported using Append mode.


")

